Posts


IMG_8813

IMG_8815


Raw Vegan Iced Chai Snickerdoodle Snowflake Cookies


IMG_8736


IMG_8788


Merry Christmas Friends!  

Iced Chai Snickerdoodle Snowflakes are SO darn incredible it's as though a Christmas angel flew in to my kitchen and took over my brain to bring these delectable (semi totally addictive) cookies to life.  Yes, they're  raw vegan… but don't bother telling anyone as they won't know the difference.  Are they healthy – yes, of course they're totally amazing for you… but again, don't bother telling anyone that either as, again, they won't know the difference, they're so tasty.  The insane cardamom icing is worth making alone, however, once spread atop these unbelievable Chai Snickerdoodle cut-outs, it's seriously all over – SO divine!  

Iced Chai Snickerdoodles Snowflake Cookies are the stuff Holiday dreams are made of… heck these gorgeous little cookies are perfect all winter long.  Come spring just switch up your cookie cutter to a tulip or a bunny and you're good to go.  You'll never want to be without your stash.  Trust.


IMG_8750

IMG_8744


IMG_8768

Raw Vegan Chai Snickerdoodle Snowflake Cookies 

IMG_8713

Raw Vegan Chai Snickerdoodle Snowflake Cookie-Cake! 

IMG_8792


Recipe for Iced Chai Snickerdoodle Snowflake Cookies

Makes 3-4 dozen depending on the size of your cookie cutters & your ability to restrain yourself from eating all the dough & icing prior ๐Ÿ™‚  Make the dough and icing 2 days in advance.  Do your cutouts the day after.  Dehydrate.  Then ice the 3rd day.

INGREDIENTS

Raw Vegan Chai Snickerdoodle Snowflake Cookies

  • 3 cups oat flour (made from 2 c oat groats processed in Vitamix)
  • 1/2 cup coconut flour
  • 1 1/2 cups medjool dates
  • 1 t celtic salt
  • 1 t Ceylon cinnamon
  • 1/2 t ginger
  • 1 1/4 t cardamom
  • 1 T powdered stevia
  • 1 T vanilla powder or 2 T vanilla extract
  • 2/3 cup almond butter
  • 1/3 cup coconut nectar
  • 1/4 cup extra virgin coconut oil
  • 1/4 cup + 2 T filtered water + extra as needed

Raw Vegan Cardamom Icing

  • 1 t vanilla powder or 2 t vanilla extract 
  • 1/4 cup coconut butter
  • 3/4 cup cashews soaked for 8 hours, rinsed & drained
  • 1/2 cup extra virgin coconut oil
  • 3 drops edible grade lemon essential oil (or sub fresh lemon juice)
  • fresh ground cardamom powder for sprinkling as the most-incredibly-delicious-do-not-skip-it garnish

METHOD

Raw Vegan Chai Snickerdoodle Snowflake Cookies

  1. Place oat flour, coconut flour, dates, celtic salt, cinnamon, ginger, cardamom, stevia, vanilla and almond butter in a large capacity food processor and process, scraping the sides of the bowl many times until the mixture resembles wet sand.
  2. Add coconut nectar, coconut oil and 1/4 cup filtered water and process until fully incorporated and the mixture comes together as a dough.  Add more water by the Tbsp as needed.  Taste to adjust seasonings & sweetness.  It will have the texture of gingerbread dough.
  3. Dump the dough out, halve it, and form it into two smooth discs.  Tightly cover each disc in saran and place in the refrigerator overnight.
  4. The next day remove one disc at a time, allow to come to room temp for 20 minutes, then roll out to 1/4" (1/4" is much easier to work with) or 1/16", just as you would standard gingerbread or sugar cookie dough.  Rolling the dough on a piece of parchment paper placed on a large cutting board works well for no-slipping.  Also, I use my french handle-free rolling pin and find it's much less effortful than a standard handle rolling pin.  
  5. As you cut each shape, press the cookie cutter into the chilled dough, then pull the edges away from the cutter on the sides that are un-usable, then pick up the cutter with dough still inside and tap it out onto a silpat lined dehydrator sheet.  As you can see, I used about the most difficult intricate snowflake designs one could use- to make it easier, I gently pushed out the skinny parts using the end of a spatula or my finger tips.  You should have no problems, especially if using a less intricate cutter.
  6. Once you've cut out all your cookies, put them into your dehydrator on 135F for 1 1/2 hours, then turn down to 115F for another 1 hour or until they're firm enough to transfer from a silpat to a screen.  Transfer is easy: simply place a dehdrator tray fitted w/ a screen over the cookies on their silpat lined tray, flip over with your hands keeping everything aligned.  Next peel the silpat off the cookies and place them back into the dehdrator, now on their screens, for 2 – 4 more hours or until reach your desired crispness.  I personally like the cookies just slightly chewy, however they're also delicious crispy! (Alternatively, if you don't yet have a dehydrator, put them in the oven on it's lowest setting with the door propped open with a wooden spoon until reach desired crispness. This method doesn't guarantee they'll stay raw.)
  7. Let the cookies cool before icing.

Raw Vegan Icing

  1. Add all the ingredients into a Vitamix and blend scraping the sides down with a spatula several times, til totally combined and creamy. 
  2. Scrape out into a bowl and place in the fridge for 2 hours.  Before you go to bed, pull the icing back out & let it sit out on the counter overnight. When you awake it will be the perfect icing texture (if your house is about 68F).  Otherwise, just leave it in the fridge overnight, come morning, take out the icing and place on your counter for an hour or until reaches icing consistency. If it warms up a bit too much while using, simply pop back into fridge for 10 minutes or until thickened, feeling free to whisk it back up to return it to perfect texture.
  3. Next ice your cookies: this is easiest if you have a couple of large cookie sheets to place cookies on as you ice them.  After each tray of cookies is complete, sprinkel with a pinch of fresh cardamom- don't be shy – I LOVE a generous pinch.  If it's cold out as in 35F or lower, place your trays outside and the icing will harden almost instantly.  Store your cookies in the fridge in airtight containers with layers of parchment separating them. 
  4. Snuggle up with a plate full of sweet, iced, caradamom dreams… high-vibe, guilt-free decadence that leaves us looking and feeling just as dreamy ๐Ÿ™‚


Do you have a favorite "traditional" recipe you'd like upgraded into a beautiful Vegan & Raw version?  Share it below for a chance to have me recreate it for you!

Be sure to follow me on Facebook, PinterestInstagramTwitter YouTube to stay current on all things SN! 


All Love,

Juliane


Thank you for visiting ๐Ÿ™‚ 

Comment, Like, Subscribe & Share!


IMG_8488


IMG_8492


IMG_8530


These festive and rustic Pear Tartelettes with Dark Chocolate & Caramel are so delectable it feels rather a feat to convey in mere words their divinity… nothing can possibly match the exquisite experience of biting into such a dream!  Alas, proceed I must and, fortunately, their sheer memory has already made things easier…


IMG_8607


Encapsulating holiday decadence, these tantalizing tartelettes glisten in caramel and drizzles of dark chocolate atop beautiful layers of dried pear tucked inside a cookie-crisp crust finished with clouds of rich, vanilla bean ice-cream.  Pear Tartelettes with Dark Chocolate, Caramel & Vanilla Bean Ice-Cream (100% raw & vegan) are not only beautiful to behold I dare say they sing holiday carols to our taste buds with their incredibly vibrant and luxurious flavor.  Joy to the World!


IMG_8578


The apple (or pear in this case) doesn't fall far from the tree, as the inspiration for these beautiful Pear Tartelettes came from a traditionally cooked pie of the very same name which my husband used to request every holiday, birthday and other opportunity possible.  Since he loved it so much it was a necessity to recreate a raw vegan version.  Expectations were surpassed by far! This high vibe raw vegan delight is unbelievably BETTER!  Of course, I act surprised, perhaps because once upon a time it truly seemed that cooked recipe could not be improved upon if one tried, and yet I'm not.  Why wouldn't fresh, living ingredients with 100% of their life force essence completely blow us away!  


IMG_8497


Pear tartelettes are absolutely phenomenal even without the accompanying Vanilla Bean Ice-cream.   However, I'm never disappointed when that small voice of persuasion steers me to take things a step further – and this was no exception.  Vanilla Bean Ice-cream is a dream all in itself too!  Clouds of pure heaven.  And when two dreams unite, as in the case of magical tartelettes topped with pure clouds of heaven, well that's what we call a miracle, fit for celebrations!  Both the Tartelettes and the Vanilla Bean Ice-Cream are simple to prepare, though undivided care and attention to each element and sourcing of the very best of ingredients is needed. However, if you're anything like me, cozy, soulful kitchen time when heavenly tastes are a necessary means to perfection, letting go into the process is the reward and the beautiful result is simply one delicious circle of love.


IMG_8547


IMG_8491

 This is my submission to the Tinned Tomatoes & Lisa's Kitchen No Croutons Required + Bookmarked Recipes Challenges and Ren Behan's Simple & in Season!


Recipe for Pear Tartelettes with Dark Chocolate, Caramel & Vanilla Bean Ice-Cream (Raw & Vegan)

(Makes 2 tartelettes)

INGREDIENTS

Raw Vegan Pear Tartelette, Crust & Crumb Topping

  • 3 Pears, peeled and thinly sliced (1/8")
  • 1 1/4 cup oat groat flour (measure the flour not the groats, grind groats in Vitamix to get flour
  • 3/4 cup dates, pitted
  • 1 t vanilla powder
  • 1 1/2 – 2 T water
  • 3 T extra virgin coconut oil
  • 2-3 drops lemon essential oil (edible grade only)
  • 3/4 t himalayan salt 
  • 1/4 cup soaked/sprouted/dehydrated walnuts
  • 2 T raw coconut crystals

Raw Vegan Caramel Filling

  • 1 cup raw cashews soaked overnight
  • 1/4 cup raw coconut nectar
  • 1/4 cup full fat coconut milk + 1 or 2 T more as needed
  •  pinch himalayan salt
  • 1/2 t vanilla powder
  • 1-2 drops lemon essential oil (edible grade only)

Raw Vegan Dark Chocolate

  • 1/4 cup raw cacao powder
  • 1/4 cup extra virgin coconut oil, melted
  • 1/4 t ceylon cinnamon
  • pinch of himalayan or celtic sea salt
  • stevia to taste (I use barely any here)

Raw Vegan Vanilla Bean Ice-Cream

  • 16 oz frozen raw baby thai coconut meat
  • 2-3 frozen super ripe bananas
  • stevia to taste
  • 1/2 t vanilla powder

 METHOD

Dried Pears

  1. Assemble sliced pears on a teflex sheet of the dehydrator and dry at 115 for 2-3 hours. Alternatively, dry on lowest setting of your oven w/ oven door propped open an inch, for and hour.

Tartelette Crusts

  1. Process Oat Groat flour, Dates and Vanilla Powder in a food processor until well incorporated and broken down.  Add water, essential oil, coconut oil and salt and pulse until fully combined and dough sticks together when pinched between two fingers.
  2. Take 1/3 of the above mixture and set it aside for latter use in crumb topping.  
  3. Press the remaining 2/3 into two 4" diameter 3/4" deep pie tart tins.
  4. Place into the dehydrator at 135F for 1 1/2 hours. Turn down to 115 for another hour then remove and set in the freezer.  Alternatively, use your oven on lowest setting w/ door propped open an inch for only 1 hour.

Crumb Topping

  1. Toss the mixture set aside in step 2 above with 1/4 cup chopped walnuts and 2 Tbsp raw coconut crystals until crumb topping coated lumps are achieved. Set aside.

Caramel

  1. Blend all the ingredients in a Vitamix until smooth and creamy adding extra coconut milk as necessary to thin.  Place mixture in fridge where it will thicken slightly.

Dark Chocolate

  1. Whisk together all ingredients until completely smooth.

Vanilla Bean Ice-Cream

  1. Blend all ingredients in Vitamix, using the tamper, until super smooth and creamy. Scoop out into an air tight container and set aside.  If storing in freezer, allow to come to room temperature for an hour to thaw and make scoopable, before serving. I actually prefer storing mine in the fridge where it retains a whipped ice-cream texture. This ice-cream does not melt away like traditional making it very nice for entertaining!

Tartelette assembly

  1. Smear a thin layer of the caramel across the bottom of each tart shell.
  2. Neatly layer the dried pears inside the two tartelette crusts, smearing a bit of the caramel over each layer, including the top, as you go.
  3. Sprinkle crumb topping over top.
  4. Set tartes in freezer for 20 minutes to set.
  5. Remove from freezer and drizzle tartes with dark chocolate.
  6. Optional: Drizzle a very TINY amount (1/2 to 1 teaspoon) of coconut nectar across the top for an extra caramel topping affect. Don't go overboard or it will turn into a sticky ooey-gooey mess!
  7. Place back in freezer for final set.  Bring to room temperature for 1 hour before serving.
  8. Tartelettes can be served whole or sliced into 4 – 6 pieces and topped with Vanilla Bean Ice-Cream.  The Vanilla Bean Ice-Cream will not melt at room temperature making these perfect for entertaining!  
  9. Revel with pleasure on a cloud of Sweet Holiday Bliss! 


Do you have a holiday favorite you'd like upgraded to a high vibe raw & vegan version?  Share in the comments below for the opportunity to have me recreate it for you!


Follow me on FacebookPinterestInstagramTwitter & YouTube to stay current on all things SN! 


All Love,

Juliane


Thank you for visiting ๐Ÿ™‚  

Comment, Like, Subscribe & Share!


IMG_8308

IMG_8084

IMG_8293

Happy Holidays Friends ๐Ÿ™‚  Bread Pudding Stuffed Pumpkin with Creme Caramel Drizzle is a deliciously sweet treat to serve up to your family and friends during this beautiful season of gratitude.  Who doesn't love a moist, rich, fruit studded bread pudding… cooked up and presented in a pumpkin no less!

Bread Pudding Stuffed Pumpkin with Creme Caramel Drizzle takes a comfort food classic to new heights in presentation and flavor with its over-the-top-unbelievable Creme Caramel Drizzle – people, we're talking uncharted territories – this raw vegan caramel is so seriously amaze! 

As always, in true StyleNectar form, we're keeping all the indulgence and none of the guilt.  I've replaced cream with rich, full-fat, medium-chain saturated fatty acid boasting coconut milk,  butter for creamy, immune & beauty-boosting coconut oil, and delicious low-glycemic, nutrient rich coconut nectar for sugar… along with a gorgeous gluten-free crusty farmer's market loaf tossed with loads of moist raisins, plump apple-juice sweetened dried cranberries, sprouted pecans, ginger, cardamom and ceylon cinammon (I don't use cassia cinnamon as it's toxic & tastes no where near as delish as ceylon).   

It's as easy as tossing everything together, stuffing the pumpkin and next thing you know the house smells diiiii-vine ๐Ÿ™‚   Prepare one larger pumpkin or several individual pumpkins… the choice is yours.  Regardless, how you do it, it's a show stopper and a sweet treat everyone will love and remember ๐Ÿ™‚


IMG_8054

IMG_8275


IMG_8278


IMG_8224


IMG_8299


IMG_8275


IMG_8279


IMG_8276

 This is my submission to Tinned Tomatoes & Lisa's Kitchen No Croutons Required & Bookmarked Recipes Challenges and to Ren Behan's Simple & In Season!


Recipe: Bread Pudding Stuffed Pumpkin w Creme Caramel Drizzle

(Serves 4-6)

Ingredients

  • 2 1/2 lb sugar pumpkin, a nice lid cut out of the top & set aside, seeds & stringy flesh removed
  • 1 cup, 1" cubed gluten free crusty bread
  • 1/2 cup pecans roughly chopped (as in halved)
  • 1/4 cup jumbo thompson raisins
  • 1/4 cup apple juice sweetened dried cranberries
  • 1/2 cup large flaked coconut (optional)
  • 3 tsp EnerG egg replacement mixed w 1/4 cup warm water (the equivalent of 2 pastured eggs)
  • 2 Tbsp coconut oil melted
  • 1/4 – 1/3 cup coconut nectar or coconut crystals
  • 1 tsp ceylon cinnamon
  • 1/2 tsp cardamom
  • 1/2 tsp ginger
  • sea salt to season interior of pumpkin, and to season mixture to taste
  • 1/2-3/4 cup coconut milk 

Creme Caramel Drizzle

  • 1 cup raw cashews soaked 6 hours & drained
  • 1/2 cup raw coconut nectar
  • 1/2 cup full fat coconut milk
  • Sea Salt to taste
  • 1/2 tsp ginger
  • 1/2 tsp cardamom
  • 1/2 tsp vanilla powder

Method

  1. Pre-heat oven to 350F.  Spread coconut oil around the bottom and sides of a deep dish suitable to house your pumpkin.
  2. Place 3 or 4 bread cubes around the interior bottom of the pumpkin to soak up juices.
  3. In a large bowl toss together the rest of the bread pudding ingredients, reserving 1/2 the coconut milk, until everything is well moistened and incorporated.  
  4. Layer the bread pudding mixture into the pumpkin being careful to distribute the nuts and dried fruit througout so it doesn't all end up at the bottom.  As you layer, drizzle the rest of the coconut milk, again helping to distribute it amongst the layers. Pack it firmly, and, since all pumpkins are shaped differently, if you have leftover bread pudding mixture, simply bake it up alongside in a couple of coconut oiled baking ramekins or tiny bundt tins.
  5. Place the pumpkin "lid" back on the pumpkin and bake for an hour 1/2 to 2 hours (checking on it after an hour 1/2) until juices are bubbling out and the skin is easily pierced with a knife.  The bread pudding will rise up out of the top of the pumpkin in a most satisfactory fashion!
  6. Meantime, make your creme caramel by simply whizzing up the ingredients in your vitamix until smooth and creamy.  Pour into a dish and place in the fridge where it will thicken further.
  7. When Bread Pudding is finished allow to cool enough to safely handle, then serve warm, either by the slice or by scooping it into small dishes, being sure to include the yummy pumpkin insides with each serving. Drizzle generously with Creme Caramel and drift off into bread pudding bliss!


Will you make yours in multiple pumpkins or one larger pumpkin like I did?  What are your Holiday plans?


Follow me on FacebookPinterestInstagramTwitter YouTube to stay current on all things SN! 


All Love, 

 Juliane 


Thank you for visiting ๐Ÿ™‚  

Comment, Like, Subscribe & Share!


Iย was absolutely thrilled when Williams-Sonoma invited me to help kick offย “Smoothie Week”ย with my favoriteย “Not Your Average Smoothie”. ย It was a match made in heaven: ย an over-the-top, mega delicious, rocket-fuel smoothie and my family’s favorite gourmet cookware specialty retailer – all coming together in one fabulous post! ย So without further ado, I present the delectable…

Chocolate Covered Matcha Smoothie! ย 

When I want to get my day started off fueled with maximum deliciousness and powerful energy (which is every day!) you’ll find me whipping up some tantalizing variation on this baby in my Vitamix. ย We’re talking layers of ย the most decadent, smooth, creamy chocolate and matcha infused nice-cream… so sweet, so divine AND brimming with the Wild superfood power of Wild Edible “Weeds”, Peruvian Maca Root, Essential Oil of Peppermint and Matcha Green Tea!

Yes, that’s right. ย Here, shining in one of the most delicious concoctions ever, are some of the most powerful sources of nutrition on the planet, beautiful ingredients, which, when tucked into a smoothie like this Chocolateย Coveredย Matcha, can make us look and feel as beautiful and powerful as they are!

Lets start with the Wild Edible “Weeds”. ย Here, I’ve used a handful of baby Dandelion Greens, Stinging Nettles & Chickweed straight from my wild edibles garden, still thriving the near freezing temps of November (a testament to how powerful they are). ย People, Wild Edible Weeds are the new Kale. ย They’re used routinely in cooking in Europe and around the world, and they’re slowly but surely making their way into the mainstream here in North America. ย You’ve probably noticed dandelion greens for sale at your local Whole Foods. ย Or, if you’re a gourmet foodie, perhaps you’ve eaten at Trump Tower’s 2 Michelin Star “Sixteen” where diners rave over the dishes incorporating chickweed, stinging nettles and salsify (belonging to the dandelion family).

ย 

Garden basket of baby dandelions, stinging nettles, wheat grass & nasturtium blooms.ย 

Wild Edibles are the wild greens growing right in our own backyards! ย They’re so powerful they’re able to thrive despite the most adverse conditions, growing out of stone walls, between sidewalk cracks and in near freezing or low moisture conditions. ย They have incredibly long root structures, enabling them to pull incredible, intense nutrition from far below the depleted surface soil. ย All that magnificent power and nutrition goes straight into our bodies when we blend them up into a smoothie!

To make things even more fantastic, by blending these raw, living greens in a high speed blender such as theย Vitamixย Professional or Vitamixย Personal Blender, we’re cracking the cell walls, unlocking far greater nutrition for our bodies than simple mastication or chewing a huge salad can yield. ย Therefore, we get way more nutritional bang out of our greens for a smaller amount used. ย This means we’re able to keep our smoothies super tasty because we don’t have to overload them with so many greens that they cease to be palatable. ย Additionally, compared to cooking, blending preserves essential vitamins, enzymes and nutrients. ย Therefore, making delicious green smoothies, with even the most bitter tasting greens, is quite easy as only a handful will provide a HUGE level of nutrition due to the “pre-digestion” that occurs in the blender ๐Ÿ™‚

ย Check out all these other great blenders too!

As if all that wild power weren’t enough, I’ve tossed in these amazing superfoods as well:

Peruvian Maca Root –ย Maca root has been used by indigenous Andean societies as a source of healing and nourishment for thousands of years. ย Studies have identified alkaloids present in maca which are known to nourish the endocrine system. ย Maca root has been used as a stress-fighting adaptogen to increase stamina, boost libido and combat fatigue. It’s a nutrient-dense whole food packed with vitamins, plant sterols and ย many essential minerals, fatty and amino acids.

Essential Oil of Peppermint (highest grade edible only) – “One of the oldest and most highly regarded herbs for soothing digestion, it may also restore digestive efficiency.* Jean Valnet MD studied peppermint’s supportive effect on the liver and respiratory systems. Other scientists have also researched peppermint’s role in improving taste and smell when inhaled. Dr. William N. Dember of the University of Cincinnati studied peppermint’s ability to improve concentration and mental sharpness. Alan Hirsch MD studied peppermint’s ability to directly affect the brain’s satiety center, which triggers a sensation of fullness after meals. This powerful essential oil is often diluted before topical application. Peppermint may also be used to enhance the flavor of food and water. Peppermint has an approximate ORAC of 373,455.” (1)

Matcha Green Tea –ย Matcha Green Tea contains 10-15 times the overall nutrients and 100 times more antioxidants compared to traditional green, white, black, rooibos, and yerba mate teas. It has high concentrations of the amino acid, L-theanine which helps to improve cognition and mood while reducing physical and mental stress. ย Matcha assists to alkalize and detoxify via the powerful and renowned catechin EGCG and chlorophyll which ย help to alkalize and detoxify the blood. ย It contains potent antioxidants which help to strengthen the immune system by protecting against free radicals.

1) http://us.ylscents.com/ylo/shop/EssentialOilSingles/PeppermintEssentialOilย 

To say this Chocolate Covered Matcha Smoothie is incredible seems an understatement after all that! ย However, there is actually more great news…

It’s also a snap to make ๐Ÿ™‚ ย 

Please enjoy!

Recipe for Chocolate Covered Matcha Smoothieย (Serves 2)

Ingredients

  • 4-6 super ripe organic frozen bananas
  • 1 handful organic wild edible greens (such as dandelion, stinging nettles, plaintain or chickweed)
  • 1 Tbsp matcha green tea powder
  • 1-2 drops organic peppermint essential oil (edible, food grade)
  • 1/2 tsp vanilla powder
  • 1-2 Tbsp cacao or carob
  • 1/4 tsp ceylon cinnamon
  • 1/2 tsp maca powder
  • stevia to taste (or substitute dates or raw honey)

*Optional: 1 Tbsp coconut nectar, melted, whisked w/ 1/2 Tbsp cacao & a pinch of ceylon cinnamon to create dark chocolate crackly topping.

Method

  1. Toss 2 or 3 of the frozen nanas, 1/2 handful of wild edible greens, matcha powder, 1-2 drops peppermint essential oil & 1/2 tsp vanilla powder into yourย Vitamix. Blend til irressitably smooth and creamy, using the tamper to assist. Dump into your fav smoothie jar or bowl.
  2. Toss the other 2 or 3 frozen nanas into your blender along with the second 1/2 handful of wild edible greens, 1-2 Tbsp cacao (or carob depending on your preference), 1/4 tsp ceylon cinnamon, 1/2 tsp maca, and stevia to taste. Blend til delectably smooth and creamy. Layer atop the matcha nice-cream.
  3. Optional: Drizzle all this yumminess with dark chocolate to make a divine crackly topping.
  4. Get ready to have THE BEST, most MAGICAL DAY EVER!!!

You may also enjoy these fabulous smoothies:

ย Cleansing Quadruple Berry Acai Smoothie
Daily Detox Green Smoothie
Chocolate Covered Strawberry Shake
Chocolate Chip Mint Shake
Epic Baby Thai Coconut Smoothie
Blueberry Coconut Shake
Delicious Green Smoothie
The Happy Shake

What’s your favorite ingredient to put in yourย โ€œNot Your Average Smoothieโ€ย ?

ย ย 

Follow me onย Facebook,ย Pinterest,ย Instagram,ย Twitterย &ย YouTubeย to stay current on all things SN!

ย 

Allย Love,

ย Juliane

ย 

Thank you for visiting ๐Ÿ™‚ย ย 

Comment,ย Like,ย Subscribeย &ย Share!


Teeth -


I have a simple yet powerful health practice for super white teeth & healthy pink gums.  In fact, according to ancient Ayurvedic medicine, my daily ritual provides not only complete oral health, it can assist the body in healing at the root of a great many overall bodily issues.  My little secret to a beautiful smile and potentially much more is called Oil Pulling.
 
The Ayurvedic technique of Oil Pulling has been practiced for centuries.  It consists of the simple practice of slowly swishing a spoonful of cold-pressed oil (coconut -my fav, sesame, or sunflower oil) around the mouth on an empty stomach for about 20 minutes and then spitting it out.  I do this every morning while showering and getting dressed, followed by a gargle with salt water.  I was instantly hooked after my first try, during which I'd swished for a marathon 30 minutes, and found my teeth so much whiter after just one session I couldn't believe my eyes.  As I continued for the next few weeks, I noticed the bit of recession I'd had around a few lower teeth where there was a greater tendency for plaque between cleanings, was completely dissapearing.  Soon, the plaque was gone and the recession had completel reversed!  Now, all my teeth are whiter than they've ever been (and that includes, before I knew better, when I'd used bleaching trays from the dentist which made my teeth hurt and my gums turn white while doing who knows what to my enamel) and all my teeth have pink, healthy little gumline 'turtlenecks' around them with no more 'cowl necks' forming around those few on the lower left!
 
While whiter, healthier teeth, pinker gums and a pristine oral cavity are hugely worthwhile in themselves (oral health being linked to the health of all the various parts of the body – the most well known of which being heart health) the potential health benefits don't stop there.  Let's delve into a little more detail on the history, these additional potential benefits and how the practice works.
  Coconut-coconut-oil-21262841
History
As mentioned, the therapy of Oil Pulling from traditional Indian Ayurvedic medicine dates back 3000 years.  Ancient Ayurvedic texts discuss oil pulling as a tool for detoxification of the entire body claiming it can be a cure for a wide variety of diseases. While there aren't scientific studies to support such benefits beyond the oral cavity, there are many individuals who claim to have reaped miraculous results beyond just the mouth. Orally, however, scientific studies do show that the practice helps strengthen teeth (including fastening loose teeth), jaws and gums, prevents decay and bleeding gums and combats gigivitis, plaque and microorganisms that cause bad breath.  Results are shown to be especially pronounced if coconut oil is used as it's a powerful destroyer of all kinds of harmful microbes, from viruses to bacteria to protozoa.

How it works & Benefits to the mouth and beyond
 
Most microorganisms inhabiting the mouth consist of a single cell.  Cells are surrounded by a lipid or fatty membrane.  When these cells make contact with the oil, also a fat, they naturally adhere to one another, thereby, trapping the lipid coated pathogens in the oil which are eventually spit out.  Additionally, research has shown that the enzymes in the saliva, which mix with the oil in the process of swishing, increase the ability of coconut oil in particular, to inhibit the growth of most strains of Streptococcus bacteria, including the bacterium that is a major cause of tooth decay.(2) Enzyme-modified coconut oil has also shown to be harmful to the yeast Candida albicans.  I've personally experimented with both sesame and coconut oil and, while both yielded results, I found the results from coconut oil more pronounced.  That said, Ayurvedic medicine and the researchers at OilPulling.com advocate use of sesame oil over coconut oil.  The following is an excerpt from OilPulling.com on the relationship between oral disease and systemic disease: 

"Scientists at the 87th General Session of the International Association for Dental Research, reported new studies connecting oral diseases with systemic diseases. A recurring theme is the relationship between periodontal (gum) disease and infant prematurity, diabetes, or stroke.  

The Mouth is known to have numerous bacteria. Usually we can keep these bacteria under control with good oral care, via brushing and other healthy routine activities. Saliva is a key defense mechanism against bacteria and viruses. It contains enzymes that destroy bacteria in different ways. But harmful bacteria can at times grow out of control and lead to serious gum infection.  Sometimes the first sign of a disease shows up in the mouth. In other cases, infections in the mouth, such as gum disease, can cause problems in other parts of the body. Conditions of the mouth can show signs of nutritional deficiencies or general infection (related to other parts of the body). For example, systemic diseases, which affect the entire body, such as diabetes, AIDS and cancer, may first become apparent because of a mouth injury or other oral problems.

When the gums are healthy, bacteria in the mouth usually don't enter the bloodstream. However, when there prevails gum disease bacteria many enter into the bloodstream by one of the two ways. Firstly, through aggressive dental treatments. Secondly, through treatments that reduce saliva flow or disrupt the normal balance of bacteria in the mouth which also may lead to oral changes, making it easier for bacteria to enter the bloodstream." (1) 

Coconut And Coconut Oil Royalty Free Stock Photos - 21262718  


The potential of this healing system in which oil is swirled back and forth in the mouth, is due the stimulating effect it has on the body's eliminatory system. It is said that it's possible to heal individual cells, cell conglomerates such as lymph nodes, and more complex tissues such as internal organs simultaneously.  According to OilPulling.com, this occurs because the beneficial microflora throughout the body are provided with a healthy continuum, in the absence of which the usual pattern of human health tends to lean toward illness rather than wellness.  Dr. Karach, of OilPulling.com, feels that regularly reversing this process so that wellness is the dominant state of the body, would likely increase the average human lifespan dramatically.  Additionally, he states, "This cleansing of the mouth and tongue is the basis for the next phase of the therapeutic process. If you have studied acupuncture you may be aware of the many points on acupuncture meridians that become congested and blocked from food, bacteria and environmental toxins which our bodies absorb. The tongue is very important to the function of most of the organs and biochemical reactions taking place in the body.  It is my theory that by removing the toxins and various microbes from the tongue we free the congestion and blockages from the important meridian pathways that interconnect our many organs." 

Method

First thing in the morning on an empty stomach before drinking any water, pour a spoonful of cold-pressed oil (sunflower, sesame or coconut -my fav) into your mouth. Swish the oil slowly around, without swallowing it, moving it through your teeth and using your tongue to help move the liquid around (however, don't gargle with it).  As you swish, you'll notice the volume of the oil expands and becomes thinner as your saliva combines with it.  If your jaw muscles get too tired, you've used too much oil and you'll know to use less the next time. It's a very simple process with no right or wrong way to swish and pull the oil. Just be natural and gentle for about 20 minutes.  Avoid spitting the oil out into the sink as coconut oil, for example, becomes solid below 76F and will clog your sink.  Additionally, the oil will be teaming with harmful bacteria and toxic bodily waste that you don't want in your sink.  For example, if this liquid were magnified 600 times under a microscope one would be able to see microbes in their first stage of development!  Twenty minutes is a general rule of thumb however you can experiment with how long you proceed.  After spitting the oil out, rinse the mouth with warm salt water as a helpful antimicrobial and to soothe any inflammation as well as to rinse away any remaining toxins which may be left out in the mouth. Lastly, brush your teeth.
 
Important Tips
 
  • Don't swallow the oil as it's full of toxins.
  • Don't spit into the sink if using coconut oil as it can clog the sink.
  • Rinse with salt or baking soda water after.
  • Don't use an oil you may be allergic to.
  • Do your own research and proceed at your own risk.
  • Start slowly to ensure less risk.  For example, swish for 5 minutes at first then build up to a longer period of time.  Perhaps start by oil pulling just once a week, and so on.  Sesame oil has been found to be less detoxifying than coconut oil, and may be a safer oil with which to start.
  • Understand that to achieve dramatic results, say beyond oral benefits, the practice may need to be adhered to for a long period of time.
  • Each person will have different results as the symptoms we seek to alleviate are caused by infinitely different roots which oil pulling may or may not be able to remedy. 
  • See the below resources for in depth white paper details on the science, FAQ's, personal testimonies and more.

Sooo, that's Oil Pulling in a nutshell!  An ancient trick I was thrilled to find works wonders on my own teeth and gums.  Oh, and one last tip, it's ok to oil pull more than once a day – even three times a day to achieve even more remarkable results – just be sure to do it a few hours after each meal to be certain of an empty stomach for optimum affect.  Apparently, however, even if one doesn't adhere to the empty stomach rule, results can still be achieved.  Let me know how it works for you! 

 
Have you ever tried Oil Pulling?
Share your experiences in the comments if you decide to try it out.


Be sure to follow me on FacebookPinterestInstagramTwitter YouTube to stay current on all things SN! 


Much Love,

Juliane


Thank you for visiting ๐Ÿ™‚

Comment, Like, Subscribe & Share!


References:
1.  http://www.oilpulling.com/precautions.htm
2. http://articles.mercola.com/sites/articles/archive/2014/05/05/oil-pulling-coconut-oil.aspx
 
I am not a healthcare practitioner or provider. To the extent that any information is provided through this website, it is for general informational purposes only and is not intended to constitute or substitute for medical advice or counseling, the practice of medicine including but not limited to psychiatry, psychology, psychotherapy or the provision of health care diagnosis or treatment, the creation of a physician-patient or clinical relationship, or an endorsement, a recommendation or a sponsorship of any third party, product or service by me. If you have or suspect that you have a medical problem, contact your health care provider promptly. Information and statements regarding dietary supplements available on this website have not been evaluated by the Food and Drug Administration and are not intended to diagnose, treat, cure, or prevent any disease.

 Yes, it's Dairy Free, Sugar Free & totally tastes SO much better!

IMG_6945
Gourmet Raw Dark Chocolate Bark (for Glowing Skin!)


Gourmet Raw Dark Chocolate Bark proves once again that delicious treats can and should be amazing for you!  This absolutely delectable confection elevates indulgence to a whole new level.  Rich, smooth chocolate in its freshest, most flavorful form packed with your favorite raw, sprouted nuts and divinely sweet, dried fruit… hey we've even tossed in some fabulous chia for an omega-3 boasting over-the-top crunch!

And Psssst… this recipe takes all of 5 minutes hands-on time ๐Ÿ™‚


IMG_6932

IMG_6925


All this flavor, texture, creaminess and chocolate bliss stands on it's own – trust me, ours have barely lasted 2 days they're THAT GOOD – and yet these babies are ALSO going to make you GLOW!  These little chocolate bars are packed with the power of cacao and all it's skintastic flavanols to fight free radicals keeping skin dewy, hydrated, thickened and protected from UV rays to boot!  The addition of chia adds omega-3's, protein, calcium, iron, magnesium and antioxidants.  Coconut oil has it's own share of amazing benefits which you can read about here.  And, as if that wern't enough to get excited about, your choice of sprouted nuts and dried fruits add even more superfood enzymes and antioxidant oomph to this veritable cocktail of beauty in a bar!


IMG_6944


Who says we can't have our candy bars AND glow too… not us!

Oh, I almost forgot to mention, these divine chocolates will put you into a great mood as well!  Raw cacao contains the feel good chemical called PEA (phenylethylamine) which is the same chemical our brain produces when we fall in love.  PEA acts similar to amphetamines such as dopamine or norepinephrine producing feelings of euphoria, happiness and love!  It really doesn't get any better than this ๐Ÿ™‚


IMG_6948


Recipe for Gourmet Raw Vegan Dark Chocolate Bark

Ingredients

  • 1/4 cup cacao (or sub carob powder)
  • 1/2 cup coconut oil
  • raw honey, coconut sugar, maple syrup, coconut nectar or stevia to taste (I used around 1 1/2 tsp liquid stevia & it was perfectly "dark chocolate" sweet. Use more for "milk chocolate" sweet.)
  • pinch of sea salt
  • 1/2 cup of your favorite chopped nuts (preferrably sprouted more on that here) and dried fruit (I used sprouted walnuts & almonds and chopped apricots, dates & cranberries plus a sprinkling of chia)
  • optional: vanilla powder, cinnamon, maca, espresso powder, ginger, cayenne, raw flaked coconut or citrus zest ~ get creative!

Method

  1. If your coconut oil is above 76F and not already liquified, place it in your mixing bowl over a pot of barely steaming water and stir just til melted. Remove immediately to keep raw.
  2. Whisk in cacao, sweetener and optional add-ons until smooth. I used stevia which whisks right in, combining easily.  If using maple syrup or coconut nectar you may want to use your food processer or blender to ensure emulsification & prevent separation of ingredients.  However, as long as you pop this in the freezer immediately, you can probably get away with just whisking.
  3. Stir in nuts and dried fruit.
  4. Line an 8×8 glass baking dish with parchment paper leaving enough overhang to create "handles" on the sides for lifting out the chocolate once it's set. Pour chocolate mixture into parchment lined dish. Spread around distributing nuts & fruit evenly. 
  5. Let set in freezer for an hour. Remove and lift out of dish using parchment paper overhang "handles".
  6. Break into pieces or cut into 8 or 12 uniform squares for your daily dark chocolate fix! Store your chocolates in the freezer and not in the cupboard where it will melt!

Enjoy ๐Ÿ™‚


Stay tuned … Salted Caramel Chocolate Mini's coming soon!


Do you have a favorite chocolate treat you'd like upgraded into a beautiful raw vegan confection?

Share in the comments below and I'll recreate it for you!


All Love,

Juliane


You may also enjoy:  Fiery Onion Rings w Creamy Aioli Dipping Sauce (Vegan, Raw, GF)


Thank YOU for visiting ๐Ÿ™‚

Comment, Like, Subscribe & Share! 

In light of my recent post, Epic Thai Coconut Smoothie, (which you must try as it's over-the-top delish), I wanted to share the amazing benenfits of Coconut Oil as well as dispel some myths about oils in general.  Please enjoy this outstanding, enlightening article by the renowned doctor and best-selling author, Dr. Joseph M. Mercola:


"This Cooking Oil is a Powerful Virus-Destroyer and Antibioticโ€ฆ

You've no doubt noticed that for about the last 60 years the majority of health care officials and the media have been telling you saturated fats are bad for your health and lead to a host of negative consequences, like elevated cholesterol, obesity, heart disease and Alzheimer's disease.

Meanwhile during this same 60 years the American levels of heart disease, obesity, elevated serum cholesterol and Alzheimer's have skyrocketed compared to our ancestors, and even compared to modern-day primitive societies using saturated fat as a dietary staple.

Did you know that multiple studies on Pacific Island populations who get 30-60% of their total caloric intact from fully saturated coconut oil have all shown nearly non-existent rates of cardiovascular disease?1

Clearly, a lot of confusion and contradictory evidence exists on the subject of saturated fats, even among health care professionals.

But I'm going to tell you something that public health officials and the media aren't telling you.

The fact is, all saturated fats are not created equal.

The operative word here is "created", because some saturated fats occur naturally, while other fats are artificially manipulated into a saturated state through the man-made process called hydrogenation.

Hydrogenation manipulates vegetable and seed oils by adding hydrogen atoms while heating the oil, producing a rancid, thickened oil that really only benefits processed food shelf life and corporate profits.

The medical and scientific communities are now fairly united in the opinion thathydrogenated vegetable and seed oils should be avoided.

These unsaturated fats, artificially manipulated into saturated fats, are also called trans fats, and no doubt you've heard about them lately. Some cities and states have now outlawed their use. There is no controversy anymore regarding the health dangers of these artificially saturated fats.

And guess what?

These are the same damaged trans fats that have been touted as "healthy" and "heart-friendly" for the last 60 years by the vegetable and seed oil interests!

But the truth finally came out. Trans fat was rebuked, debunked, and revealed as the true enemy to good health that it has always been, regardless of what the seed- and vegetable oil shills told the American public for the last half century.

Unfortunately, this rightful vilification of hydrogenated saturated fats has created a lot of confusion regarding naturally occurring saturated fats, including coconut oil.

If one form of saturated fat is bad for you, the argument goes, then all saturated fat must be bad.

Right?

Nothing could be further from the truth!

The Truth about Coconut Oil

The truth about coconut oil is obvious to anyone who has studied the health of those who live in traditional tropical cultures, where coconut has been a nutritious diet staple for thousands of years.

Back in the 1930's, a dentist named Dr. Weston Price traveled throughout the South Pacific, examining traditional diets and their effect on dental and overall health. He found that those eating diets high in coconut products were healthy and trim, despite the high fat concentration in their diet, and that heart disease was virtually non-existent.

Similarly, in 1981, researchers studied populations of two Polynesian atolls. Coconut was the chief source of caloric energy in both groups. The results, published in the American Journal of Clinical Nutrition,2 demonstrated that both populations exhibited positive vascular health.

In fact, no evidence exists that the naturally occurring high saturated fat intake had any kind of harmful effect in these populations!

That's not what you expected, is it? Based on 60 years of negative public policy towards naturally occurring saturated fats, you would expect these cultures to be rife with clogged arteries, obesity and heart disease.

It may be surprising for you to realize that the naturally occurring saturated fat in coconut oil actually has some amazing health benefits, such as:

  • Promoting your heart health
  • Promoting weight loss, when needed
  • Supporting your immune system health
  • Supporting a healthy metabolism
  • Providing you with an immediate energy source
  • Keeping your skin healthy and youthful looking
  • Supporting the proper functioning of your thyroid gland

But how is this possible?

Does coconut oil have some secret ingredients not found in other saturated fats?

The answer is a resounding "yes".

Coconut Oil's Secret Ingredient

50 percent of the fat content in coconut oil is a fat rarely found in nature called lauric acid. If you're a frequent reader of my newsletter you already know that I consider lauric acid a "miracle" ingredient because of its unique health promoting properties.

Your body converts lauric acid into monolaurin, which has anti-viral, anti-bacterial and anti-protozoa properties.

Monolaurin is a monoglyceride which can actually destroy lipid coated viruses such as:

  • HIV, herpes
  • Measles
  • Influenza virus
  • Various pathogenic bacteria
  • Protozoa such as giardia lamblia.

Lauric acid is a powerful virus and gram-negative bacteria destroyer, and coconut oil contains the most lauric acid of any substance on earth!

Capric acid, another coconut fatty acid present in smaller amounts, has also been added to the list of coconut's antimicrobial components.

This is one of the key reasons you should consider consuming coconut oil, because there aren't many sources of monolaurin in our diet. But the health benefits of coconut oil don't stop there.

The Benefits of Medium-Chain Fatty Acids

Coconut oil is about 2/3 medium-chain fatty acids (MCFAs), also called medium-chain triglycerides or MCTs. These types of fatty acids produce a whole host of health benefits.

Coconut oil is nature's richest source of these healthy MCFAs.

By contrast, most common vegetable or seed oils are comprised of long chain fatty acids (LCFAs), also known as long-chain triglycerides or LCTs.

Let me tell you why these long-chain fatty acids are not as healthy for you as the MCFAs found in coconut oil.

  • LCFAs are difficult for your body to break down — they require special enzymes for digestion.
  • LCFAs put more strain on your pancreas, liver and your entire digestive system.
  • LCFAs are predominantly stored in your body as fat.
  • LCFAs can be deposited within your arteries in lipid forms such as cholesterol.
  • In contrast to LFCAs, the MCFAs found in coconut oil have many health benefits, including the following beneficial qualities:
  • MCFAs are smaller. They permeate cell membranes easily, and do not require special enzymes to be utilized effectively by your body.
  • MCFAs are easily digested, thus putting less strain on your digestive system.
  • MCFAs are sent directly to your liver, where they are immediately converted into energy rather than being stored as fat.
  • MCFAs actually help stimulate your body's metabolism, leading to weight loss.

Coconut Oil Helps Fight Diabetes

Your body sends medium-chain fatty acids directly to your liver to use as energy. This makes coconut oil a powerful source of instant energy to your body, a function usually served in the diet by simple carbohydrates.

But although coconut oil and simple carbohydrates share the ability to deliver quick energy to your body, they differ in one crucial respect.

Coconut oil does not produce an insulin spike in your bloodstream. You read that correctly, Coconut oil acts on your body like a carbohydrate, without any of the debilitating insulin-related effects associated with long-term high carbohydrate consumption!

Diabetics and those with pre-diabetes conditions (an exploding health epidemic in America), should immediately realize the benefit of a fast acting energy source that doesn't produce an insulin spike in your body. In fact, coconut oil added to the diets of diabetics and pre-diabetics has actually been shown to help stabilize weight gain, which can dramatically decrease your likelihood of getting adult onset type-2 Diabetes.


Did You Know?

coconut uses infographic


Cococut Oil, the Friend to Athletes and Dieters

If you live in the United States, you have an almost 70 percent chance of being overweight.

And, by now, I'm sure you're well aware that obesity affects your quality of life and is linked to many health concerns.

One of the best benefits of coconut oil lies in its ability to help stimulate your metabolism.

Back in the 1940s, farmers found out about this effect by accident when they tried using inexpensive coconut oil to fatten their livestock.

It didn't work!

Instead, coconut oil made the animals lean, active and hungry.

However, many animal and human research studies have demonstrated that replacing LCFAs with MCFAs results in both decreased body weight and reduced fat deposition.

In fact, the ability of MCFAs to be easily digested, to help stimulate the metabolism and be turned into energy has entered the sports arena. Several studies have now shown that MCFAs can enhance physical or athletic performance.

Additionally, research has demonstrated that, due to its metabolic effect, coconut oil increases the activity of the thyroid. And you've probably heard that a sluggish thyroid is one reason why some people are unable to lose weight, no matter what they do.

Besides weight loss, there are other advantages to boosting your metabolic rate. Your healing process accelerates. Cell regeneration increases to replace old cells, and your immune system functions better overall.

Coconut Oil on Your Skin

Besides the mounting medical and scientific evidence that coconut oil has powerful positive health benefits when eaten, it has also been used for decades by professional massage therapists to knead away tight stressed muscles.

However, you don't have to be a professional massage therapist to gain the skin and tissue support benefits of coconut oil. Just use coconut oil as you would any lotion.

Coconut oil is actually ideal for skin care. It helps protect your skin from the aging effects of free radicals, and can help improve the appearance of skin with its anti-aging benefits.

In fact, physiologist and biochemist Ray Peat, Ph.D. considers coconut oil an antioxidant, due to its stability and resistance to oxidation and free radical formation. Plus, he believes it reduces our need for the antioxidant protection of vitamin E.

Like Dr. Peat, many experts believe coconut oil may help restore more youthful-looking skin. When coconut oil is absorbed into your skin and connective tissues, it helps to reduce the appearance of fine lines and wrinkles by helping to keep your connective tissues strong and supple, and aids in exfoliating the outer layer of dead skin cells, making your skin smoother.

Coconut Oil and Your Heart

Heart disease is the number one cause of death in the U.S. And heart disease is often a silent killer. The first sign of cardiovascular disease is commonly a heart attack, and sadly, over one third of heart attacks are fatal.

And despite the propaganda, the truth is this: it is UNSATURATED fats that are primarily involved in heart disease, not the naturally occurring saturated fats, as you have been led to believe.14

Plus, the polyunsaturated fats in vegetable and seed oils encourage the formation of blood clots by increasing platelet stickiness. Coconut oil helps to promote normal platelet function.

Coconut Oil in Your Kitchen

I only use two oils in my food preparation.

The first, extra-virgin olive oil, is a better monounsaturated fat that works great as a salad dressing.

However, it should not be used for cooking. Due to its chemical structure, heat makes it susceptible to oxidative damage.

And polyunsaturated fats, which include common vegetable oils such as corn, soy, safflower, sunflower and canola, are absolutely the worst oils to use in cooking. These omega-6 oils are highly susceptible to heat damage because of their double bonds.

I strongly urge you to throw out those omega-6 vegetable oils in your cabinets.

Why?

Reason # 1: Most people believe that frying creates trans-fat. That is not the major problem, in my opinion. Although some are created, they are relatively minor. There are FAR more toxic chemicals produced by frying omega-6 oils than trans-fat.

Frying destroys the antioxidants in oil and as a result oxidizes the oil. This causes cross-linking, cyclization, double-bond shifts, fragmentation and polymerization of oils that cause far more damage than trans-fat.

Reason # 2: Most of the vegetable oils are GMO. This would include over 90 percent of the soy, corn and canola oils.

Reason # 3: Vegetable oils contribute to the overabundance of damaged omega-6 fats in your diet, which creates an imbalance in the ratio of omega-6 to omega-3. As you know from my extensive writing on this subject, I believe that excessive consumption of damaged omega-6 fats contributes to many health concerns.

They are all highly processed and consumed in amounts that are about 100 times more than our ancestors did a century ago. This causes them to distort the sensitive omega-6/omega-3 ratio which controls many delicate biochemical pathways which results in accelerating many chronic degenerative diseases.

There is only one oil that is stable enough to resist mild heat-induced damage, while it also helps you promote heart health and even supports weight loss and thyroid function — coconut oil.

So, whenever you need an oil to cook with, use coconut oil instead of butter, olive oil, vegetable oil, margarine, or any other type of oil called for in recipes. Even though I don't fully recommend frying foods, if you must fry, by all means use coconut oil — it's your smartest choice.


Coconut Oil Safety

The medium-chain fats in coconut oil are considered so nutritious that they are used in baby formulas, in hospitals to feed the critically ill, those on tube feeding, and those with digestive problems. Coconut oil has even been used successfully by doctors in treating aluminum poisoning.15

Coconut oil is exceptionally helpful for pregnant women, nursing moms, the elderly, those concerned about digestive health, athletes (even weekend warriors), and those of you who just want to enhance your overall health."

To learn more about the author of this article, Dr. Joseph M. Mercola, visit his excellent website and online store at  www.Mercola.com.


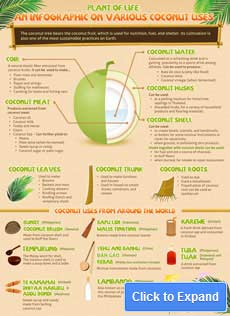
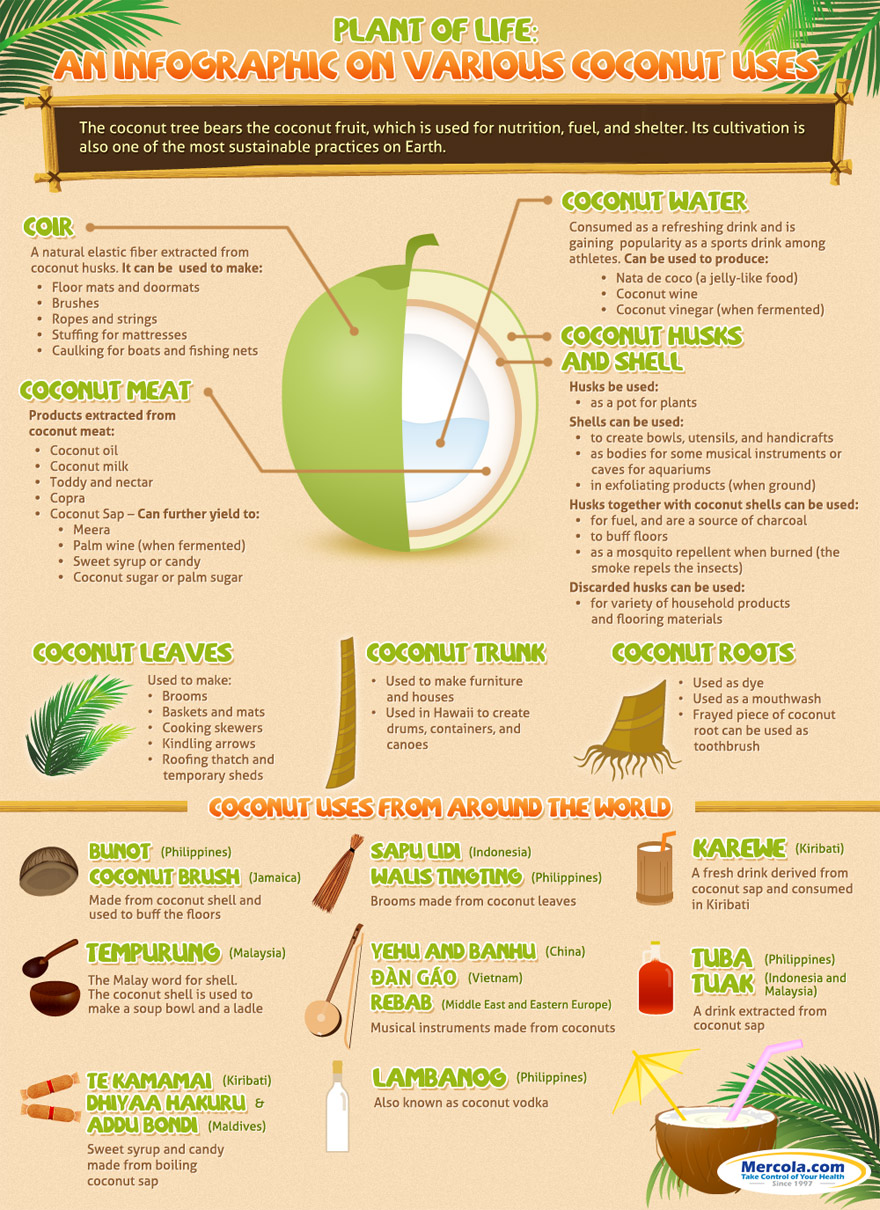
Meantime, enjoy the below genius ways to incorporate Coconut Oil in your life provided by Thank Your Skin and give them a follow for lots more helpful tips and tricks!


10 Genius Ways To Use Coconut Oil For Healthy Skin

What is your favorite oil to use in food preparations?  

Do you have other favorite oils?  For example, I love Pomegranate Oil as an after bath moisturizer & Baobab Oil mixed into my nighttime facial moisturizer.


If you liked this post, say thanks by sharing.